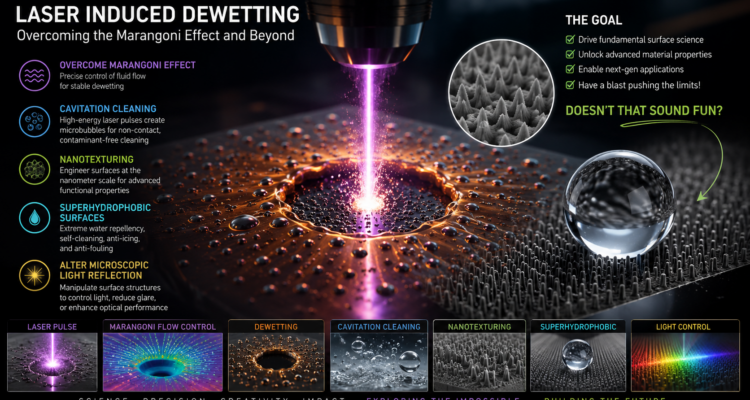
Serving Middle TN for over 20 yrs.

Fill out the form below to get your free initial consult

    📩 Contact Tech Bravo

    Complete the form below and we'll get back to you shortly.


    Serving Middle TN for over 20 yrs.

    N2 TEA Laser Build – Part 4: Circuit & Safety Wiring

    Circuit & Safety Wiring. The most critical step now is the wiring. We need to complete the Blumlein circuit and, most importantly, prepare the wiring for the Safety that makes this kit more suitable for classrooms, etc… Triple-Threat Safety Imperative: READ THIS FIRSTTHIS PROJECT INVOLVES THREE DISTINCT LETHAL/HARMFUL HAZARDS. DO NOT ATTEMPT REPLICATION WITHOUT ADVANCED HIGH-VOLTAGE EXPERIENCE AND PROPER VENTILATION.1.  Lethal High Voltage: The  circuit is lethal. NEVER touch the circuit when power is applied. All components must be contained within a grounded, non-conductive enclosure with safety interlocks before operation.2.  Harmful UV Radiation: The laser emits deep ultraviolet () light (around ). This radiation is invisible, damaging to the retina, and can cause skin burns. NEVER look into the beam or at the spark without certified UV-blocking eye protection.3.  Toxic Ozone Production: The high-energy discharge generates ozone () gas (a toxic air pollutant). Operation must be limited to short bursts and always performed in a well-ventilated area or under forced exhaust. Classroom Use: Replication in any educational setting requires direct, professional supervision and a fully interlocked safety enclosure system.

    N2 TEA Laser Build – Part 2: The 10 kV Concept

    N2 TEA Laser Build – Part 2: The 10 kV Concept – Okay, I’m ready to pull back the curtain! I’m building a Nitrogen (N2) TEA (Transversely Excited Atmospheric) Laser. This is a high-performance physics experiment that relies on a single principle: speed. We use 10,000V to create an electrical pulse so fast it tricks the nitrogen gas (present in the open air, in this case) into emitting an invisible UV laser beam.. More here: https://techbravo.net/n2-tea-laser-build-part-2-the-10-kv-concept/

    N2 TEA Laser Build – Part 1: What Is That?

    The workbench is getting weird this week. (Yes, that’s my Thunder Laser engraver, I know, I know—it’s not supposed to be a workbench! 😅) This is the first in a series of posts where I break down the science and build a ‘Trophy-Worthy’ high-voltage device. I’ve got steel, copper, aluminum, magnets, switches, some wiring, etc..—but I’m actually building something that combines advanced physics, high-voltage power (10,000 V), and lasers! The goal is to harness the fastest electrical pulse a human can create in the lab to generate a powerful ultraviolet beam. This thing is cool and you will either walk out of school with a science trophy in your hand, or in handcuffs, depending on what day you bring it in 🤪… so always check with your school or organization before taking a science project like this to school, etc…! STAY TUNED!!! #PhysicsFun #HighVoltage #DIYElectronics #Lasers #PulsedPower #WhatsThis  

    Taking A Hacksaw To My Aurora 8 v1.0

    So. I’m burning the midnight oil and burning up a few hacksaw blades and cutting up the Aurora a little bit to give a little more clearance. This V1 housing had this and I made a linear table for the V2 and it works on this one, but it sits too far forward. So I’m making that so I can slide it back. the full use of the workspace. I decided to use just a hacksaw and a small drill bit to perforate some material at specific locations. It was the least invasive, least noisy, least messy strategy. I didn’t want to run a grinder or dremel and all that. i’ll dress up those edges and it will look almost like it was meant to be. More on setup and use to follow. https://www.youtube.com/shorts/0JF78CIRTbw?feature=share https://www.youtube.com/shorts/0JF78CIRTbw?feature=share Okay, so I cut the sides out of the Aurora and I cut some rudimentary guides out of some stuff I got from Houston acrylic. Ice blue mirror. It’s beautiful and it looks pretty on my linear table and it stinks to high heaven when you cut it. It’s terrible.  My daughter had some furniture with wobbly legs and we discovered that they had these little feet them so I ordered a bunch on Amazon and gave her what she needed and kept the rest. And lo and behold, they’re perfect to hold my guides in place on here. They’re low profile. I can tighten them up with a quarter or a screwdriver back edge of a knife or whatnot. Just thought that was cool. I’ll keep you posted. More to follow. Okay, so I’ve got the guides on. I’ve got 10 cards loaded. I’m using uh batch repeat marking actually in LightBurn. So basically it’ll allow me to load 10 cards on here. I could load up to 16 the way I have it, if I configured a little bit differently. I’m just going to do 10 at a time. So now I can let it do 10 cards at once automatically and not have to babysit the machine. So finish this one and move to the next one and go all the way to the end. Pretty cool. https://www.youtube.com/shorts/0JF78CIRTbw?feature=share

    Thunder Bolt Head Camera

    I had originally tested LightBurn’s Head Mount camera function on my Thunder Nova 35-80 and never got to test it fully. This was early on and was the v1.2 beta, more info on that implementation can be found in this Thunder Laser USA Knowledgebase Article: Head Mounted LightBurn Camera.   So I figured since LightBurn public release was at v1.7.01, I’d run a head cam on my Thunder Bolt and see if I could get it going.   I Designed a simple mount in Fusion and printed it on my Bambu P1S (after some recalibration and tweaking). Here is the calibration attempt.